¶ Introduction to Shortcuts - Streamline Your BIM Processes
This documentation provides an in-depth guide to Shortcuts, a powerful feature of Assistant that aims to streamline BIM (Building Information Modeling) processes.
Shortcuts empower engineers and modelers to automate repetitive tasks, ensure consistency in workflows, and enhance productivity.
By adding buttons to design software interfaces and enabling the execution of pre-configured actions, Shortcuts simplifies access to essential processes and utilities. This documentation will lead you through the setup process, customization options, and benefits of using Shortcuts.
¶ Introduction to Shortcuts
Shortcuts is a powerful feature within Assistant specifically designed to streamline BIM processes, currently supporting Revit and Tekla. It simplifies the execution of pre-configured actions by adding them directly to the design software, eliminating the need for team members to search for files or communicate instructions on how to execute BIM processes external to the software.
By translating the Actions file into a Ribbon button, Shortcuts makes it incredibly convenient for team members to easily locate and access the predefined actions. Each Action Group within an Actions file is represented by a single button, enabling the execution of a series of targeted actions with a single click. This simplifies the workflow and reduces the time spent on manual execution of individual tasks.
Shortcuts allows BIM managers, responsible for the model, to configure the Actions files and add the buttons to the design software's Ribbon interface. This ensures that all team members working on the project have access to the relevant buttons specific to the project requirements. BIM managers are also responsible for configuring the Events Shortcuts, allowing them to designate specific tasks for automatic execution upon opening the model. This enables seamless integration of BIM processes and automates necessary actions, improving efficiency and eliminating the need for manual intervention.
During the execution of a Shortcut, a visual progress indicator in the form of an Assistant icon appears within the design software. This indicator provides real-time updates on the progress of the Shortcut's execution, ensuring transparency and visibility into the ongoing processes.
With Shortcuts, team members can bid farewell to the time-consuming task of searching for files or communicating execution steps within the team. Shortcuts simplifies access to and execution of BIM processes, boosting productivity and facilitating a smoother workflow within the design software.
¶ Getting Started with Shortcuts
Shortcuts can be configured directly within the Assistant application, which provides a dedicated window for managing your Shortcuts. To access the Shortcuts window:
- Open the Assistant application.
- Once Assistant is launched, locate the hamburger menu icon, represented by three horizontal lines, in the top-left corner of the Assistant window.
- Click on the hamburger menu icon to reveal additional options. In the menu that appears, look for the
Shortcutsitem and click on it.
This will open the Shortcuts window within Assistant, where you can begin configuring your Shortcuts to streamline your BIM processes.
¶ Configuring Shortcuts
Select the design software for which you want to configure Shortcuts.
In the Shortcuts window, you will see the ribbon bar of the design software, including its tabs and panels.
¶ Adding buttons
To add a Shortcut button to a panel, you have two options:
-
Drag and Drop: Simply drag and drop an Actions file from the Assistant window to the desired panel. By default, all the necessary configurations are selected, but you can modify them later if needed.
-
Plus Button: Click the plus button on a panel to open the "Add New Button" dialog.

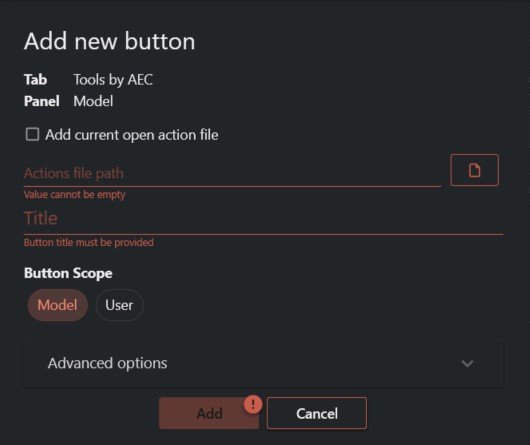
¶ Add button dialog
If desired, check the "Add current open action file" option to add the currently open Actions file. Alternatively, you can browse for a specific Actions file on your computer.
The title of the button is automatically filled in with the filename, but you can customize it if needed.
Select the scope of the button: "Model" to add it to the current open model or "User" to add it for personal use.
In the advanced options, you can choose to run all disabled tasks and select whether Assistant should automatically close popups. By default, popups are not closed to enable user input during the run.
¶ Customize configuration
After adding a Shortcut button, you can further customize its configuration by right-clicking on the button. This will display a context menu with various options, including:
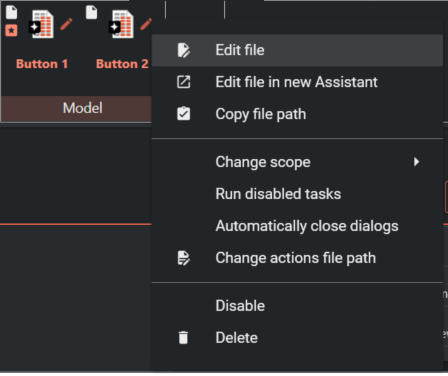
- Edit file: This opens the Actions file for editing within Assistant.
- Edit file in new Assistant: This opens the Actions file in a new instance of Assistant.
- Copy file path: This copies the file path for reference.
- Change scope: This modifies the scope of the Shortcut button (User/Model).
- Run disabled tasks: This selects whether disabled tasks should be run.
- Automatically close popups : This selects whether popups should be closed automatically during the run.
- Change Assistant file path: This allows you to update the file path if the Actions file has been moved.
- Disable: This temporarily hides the button in the design software.
- Delete: This removes the Shortcut button.
¶ Multiple Action Groups
When an actions file consists of multiple action groups, the button associated with that file will appear as a list button with a master icon and title.
Each action group within the file will be represented as a separate button hidden in a popup, accessible from the main button. This allows for a more organized and intuitive representation of different sets of actions within the button.
Each sub buttons title is the name of the Action Group.
¶ Chaning icons on buttons
Once you have added a button, you have the option to customize its icon.

Follow these steps to change the icon for a button:
-
Edit Button: Locate the button you want to customize and click the pencil icon next to the default icon. This will set the button in edit mode.
-
Change Main Button Icon and Title: In the editing mode, you can change both the main button title and its icon. This allows you to provide a clear visual representation of the button's purpose.
-
Selecting Icons: When changing the icon, you have a choice between built-in icons or selecting your own custom picture.
- For built-in icons, a gallery of icons will be available to choose from.
- For Custom picture, you can select any picture file. The picture should have a minimum size of 32x32 pixels for optimal clarity.
-
Individual action group within a button: Click the main button representing the actions file. You can identify buttons with multiple action groups by a small down arrow located at the bottom of the button. A popup will appear with the action group buttons. Each action group button will have its own icon and title.
Click the individual action group button for which you want to change the icon.
Instant Icon Storage: Any changes made to the icon selections will be instantly stored on the associated action file, even if it is not open. This ensures that if you have added the same action file to multiple models, all instances of the button will have the same icon.
By following these steps, you can personalize the appearance of your shortcut buttons by adding custom icons, making them more visually appealing and easily distinguishable.
¶ Rearranging Buttons
Once you have added shortcut buttons, you can easily rearrange them within the panels and tabs. Simply click and drag a button to another panel or tab to reposition it. This allows you to customize the arrangement of buttons to suit your preferences and optimize your workflow.
¶ Restoring Deleted Buttons
If you accidentally delete a shortcut button, don't worry! To restore a deleted button, open the paperbin popup and drag the button back to the desired panel. This ensures that you can easily recover any buttons that were deleted by mistake.
¶ Adding Buttons to Design Software
Once you have configured your desired button configuration, follow these steps to apply the changes to the design software's ribbon:
-
Click the "Apply" button: After finalizing the button configuration in the shortcuts view, click the "Apply" button. This action will instantly update the buttons in the design software's ribbon.
-
Handling Model Changes: If you have changed the model since opening the shortcuts view, you will receive a popup notification. This notification will prompt you to switch back to the correct model before applying the changes.
- Switching to the Correct Model: To proceed with applying the changes, close the current model and reopen the correct model within the design software. This step ensures that the updated button configuration is accurately applied to the intended model.
By clicking the "Apply" button, you can efficiently update the buttons in the design software's ribbon. Additionally, the notification system will remind and guide you to switch to the correct model if any changes have been made since opening the shortcuts view.
¶ Running Actions on Model Open Events
To run actions files when a model is opened, follow these steps to configure events within the Assistant app:
1. Switch to the Events View: In the Assistant window, click on the "Events" button. This action will switch the view to the events configuration interface.
2. Select the Event Scope: In the events view, you will see two tabs to the left: "User" and "Model." Select the appropriate tab to determine whether the event should be stored in the user or model scope.
3. Adding Events: To add an event, you can either drag and drop an actions file to the list area or click the "Add event" button.
- Drag and Drop: Simply locate the desired actions file and drag it to the list area. The event will be added to the list with the default title set as the filename.
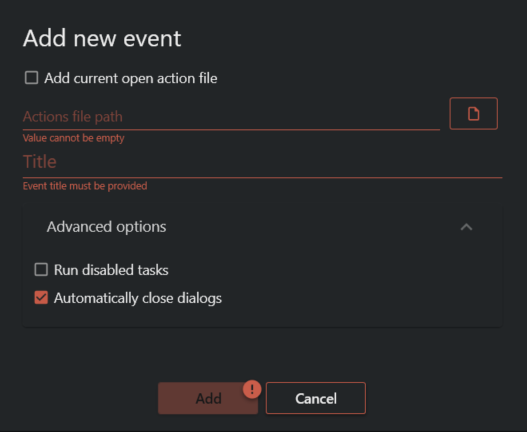
- Add Event Dialog: Clicking the "Add event" button will open the "Add new event" dialog. In this dialog, you have the option to select the current open actions file or browse for a file to add. The default title of the event will be set as the file name.
- Advanced Options: In the advanced options within the "Add new event" dialog, you can specify additional configurations for the event. This includes selecting to run all disabled tasks within the actions file and choosing whether Assistant should automatically close popups during the event execution. The default behavior is to close popups for events.
By configuring the events view within the Assistant app, you can define and manage events to run actions files when a model is opened. This allows you to automate specific processes and tasks, enhancing the efficiency and productivity of your workflow.
¶ Selecting actions to Run on an event
You can access the actions dialog by clicking the "All" button on the event item. This action will open a new dialog specifically designed for selecting the actions.
By default, if no tasks are selected, all tasks within the Actions file will be executed when the event is triggered.
¶ Customize configuration
After adding a Shortcut event, you can further customize its configuration by right-clicking on the button. This will display a context menu with various options, including:
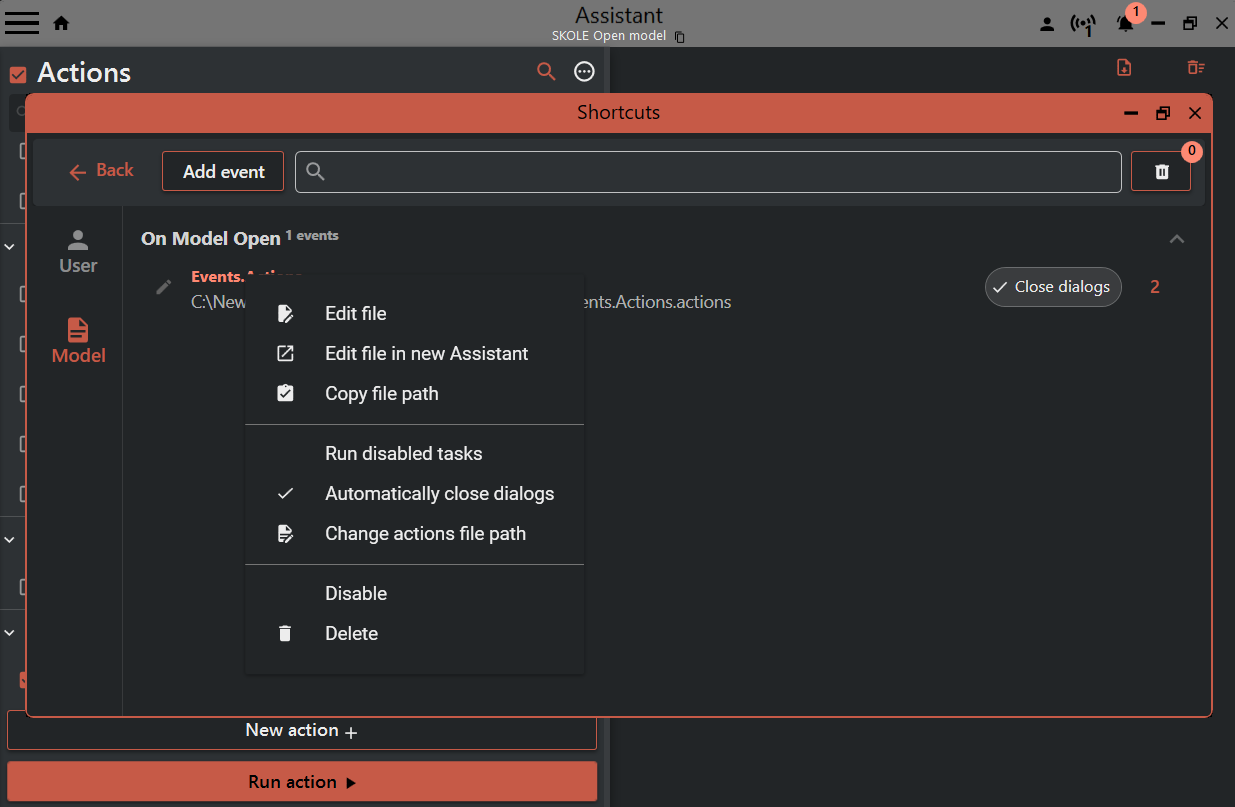
- Edit file: This opens the Actions file for editing within Assistant.
- Edit file in new Assistant: This opens the Actions file in a new instance of Assistant.
- Copy file path: This copies the file path for reference.
- Run disabled tasks: This selects whether disabled tasks should be run.
- Automatically close popups : This selects whether popups should be closed automatically during the run.
- Change Assistant file path: This allows you to update the file path if the Actions file has been moved.
- Disable: This temporarily hides the button in the design software.
- Delete: This removes the Shortcut button.
¶ Project-Specific Buttons
Project-specific buttons in the Shortcuts feature are designed to be loaded into the design software ribbon for all users opening the model with Tools installed. These buttons provide functionality tailored to the specific project and allow users to access features relevant to their workflows.

Buttons are maked with a file icon top left
Here are some typical use cases for project-specific buttons:
-
Exporting and Delivering Project Files: Users can use project-specific buttons to automate the export of PDFs, IFCs, and other file formats. These buttons can be configured by the BIM manager to follow the project's specific file sharing and delivery processes.
-
Updating Parameter Values: Project-specific buttons can be used to streamline the process of updating parameter values on elements within a model. This can improve efficiency when maintaining consistent data or performing mass updates.
-
Executing Project-Specific Scripts: Buttons can be configured to run project-specific scripts written in c#, Python, or Dynamo. This allows users to automate custom processes or execute specialized calculations or checks.
-
Using Discipline-Specific Extensions: Project-specific buttons can enable the execution of discipline-specific extensions tailored to different modeling tasks. This ensures that users have access to the necessary tools to perform their specific roles.
-
Exporting and Updating Dashboards: Buttons can be configured to export- and update project-specific dashboards with relevant data. This enables users to keep project stakeholders informed with up-to-date information in an efficient manner.
-
Model Checking: Project-specific buttons can be utilized to execute model check processes tailored to the project's specific requirements. This ensures that the model adheres to predefined standards and facilitates quality control.
By utilizing project-specific buttons, Revit and Tekla users can easily access features customized for their specific discipline or project. This approach enables users to focus on what is important for the project without the need to install multiple different add-ins. BIM managers can conveniently collect all relevant buttons into one tab, making them readily available for everyone on the project team.
¶ Private Buttons for Personal Workflows
Private buttons in the Shortcuts feature are designed to be loaded when the design software starts up. These buttons are specific to individual users and serve their personal workflows.
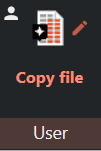
Buttons are maked with a person icon top left
Here are some typical use cases for private buttons:
-
Opening Personal Models: Private buttons can be configured to open the models that users actively work on. These buttons ensure that the correct worksets and linked files are loaded automatically, saving time and improving efficiency.
-
Simplifying Multi-Project Workflows: In scenarios where a user works on multiple smaller projects, private buttons can eliminate the need to add project-specific buttons to each model individually. This means that users can maintain their preferred workflows across different projects without manual configuration.
-
Personal Favorite Workflows: Private buttons allow users to create and use their own favorite workflows that may not align with the rest of the project. This flexibility enables individuals to optimize their processes and increase productivity based on their specific needs and preferences.
-
Generic Discipline-Specific Workflows: Private buttons can also be used to create generic discipline-specific workflows that are not project-specific. These buttons help streamline tasks and processes common to a particular discipline, allowing users to access frequently performed actions quickly.
By utilizing private buttons, users can personalize their Assistant experience, tailor workflows to their individual needs, and streamline their design software workflows for enhanced productivity.
¶ Progress Popup in the Design Software
When a button that was added by Assistant shortcuts is clicked, an Assistant icon with a progress bar will appear in the design software. This pop-up provides visual feedback on the execution status of the associated action. Here are some key features of the progress pop-up:
-
Status Icons: Once the execution is complete, a status icon will appear to indicate the result. A green checkmark indicates success, an X indicates failure, and an exclamation mark indicates partial success.
-
Accessing Run Details: To see details about the run and previous runs, click the button with three dots (ellipsis) on the pop-up. This will open a menu where you can access additional information.
-
Hiding Old Runs: By default, runs older than one minute are hidden. You can check the "Show all" checkbox to display all runs, including those older than one minute.
-
Automatic Hide: The status icon on the pop-up disappears automatically after one minute. If you want to view it again, you need to press a button again or open the context menu by right-clicking the pop-up or button.
-
Open Details in Assistant: To examine the details about a specific run, you can press the "Details" button. This will open a new instance of Assistant with all the relevant information about the run.
By using the progress pop-up and its associated features, users can track the progress of their actions, access run details, and review previous runs for further analysis and troubleshooting.