¶ Void Manager
The Void Manager app is an Autodesk Revit tool designed to streamline the coordination process between Mechanical, Electrical, and Plumbing (MEP) engineers and Structural (STR) engineers. It facilitates efficient communication and management of Voids/Holes for MEP components within a STR model. The app enables MEP engineers to propose Provision for Void (PoV) elements using MagiCAD's PoV feature. STR engineers can then review these proposals, add comments, and assign statuses to each void, ranging from acceptance to rejection or requests for revision.
Once a void is accepted, the app tracks any changes and ensures that all communication is stored within the model elements. STR engineers can then proceed to create the physical holes in their models as per the accepted proposals. The app keeps a log of who created or updated these holes and records any adjustments to their placement.
Void Manager's versatile filtering system allows for a tailored view of voids, enabling users to focus on specific elements and statuses. It enhances collaboration by allowing users to select host elements for hole creation, keeping MEP engineers updated by linking in the STR model with specified holes. Through its intuitive interface, the app not only simplifies void management but also ensures accuracy and accountability in the collaborative process of building design and construction.
¶ Getting Started with Void Manager
¶ Starting Up
Launch Void Manager within Tools in Autodesk Revit.
You will be greeted with the startup screen offering three options:
- Load voids from current project
- Load voids from active view
- Load voids from custom filter
Choose the one that fits your workflow to begin.
¶ Load Voids by Active View
Voids in linked Revit models can now be loaded based on the active view in the host model. This allows structural models to limit the number of loaded voids, potentially reducing load and refresh times.
¶ Managing Voids
¶ Viewing and Sorting Voids
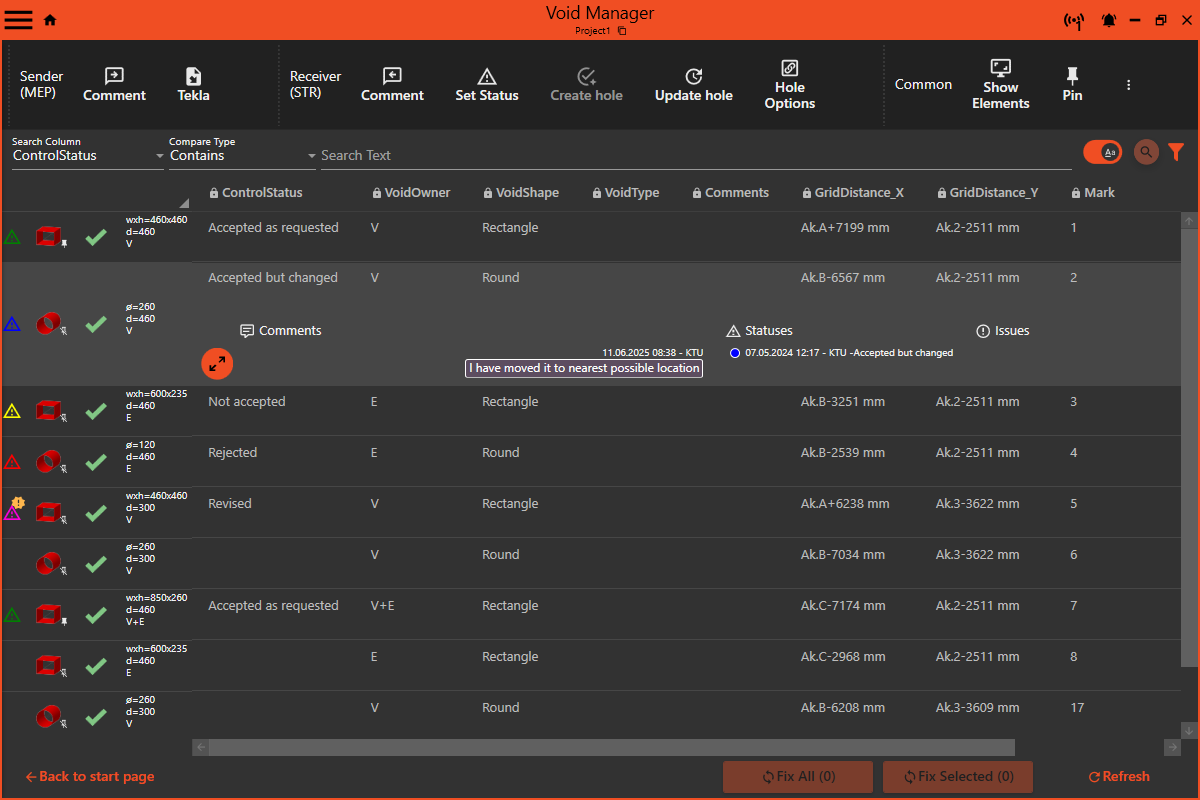
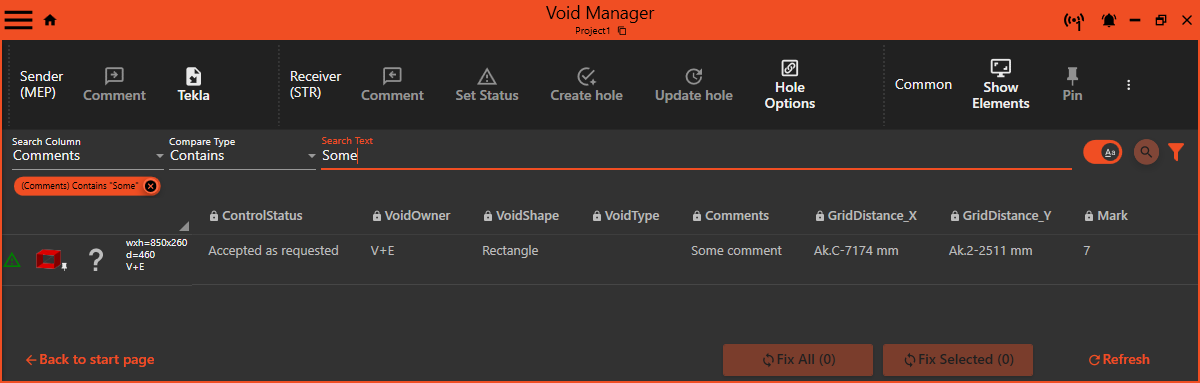
- Once voids are loaded, you will see a list of voids with various icons indicating their status.
- You can sort and filter this list by comments and other parameters.
Read about configureing columns
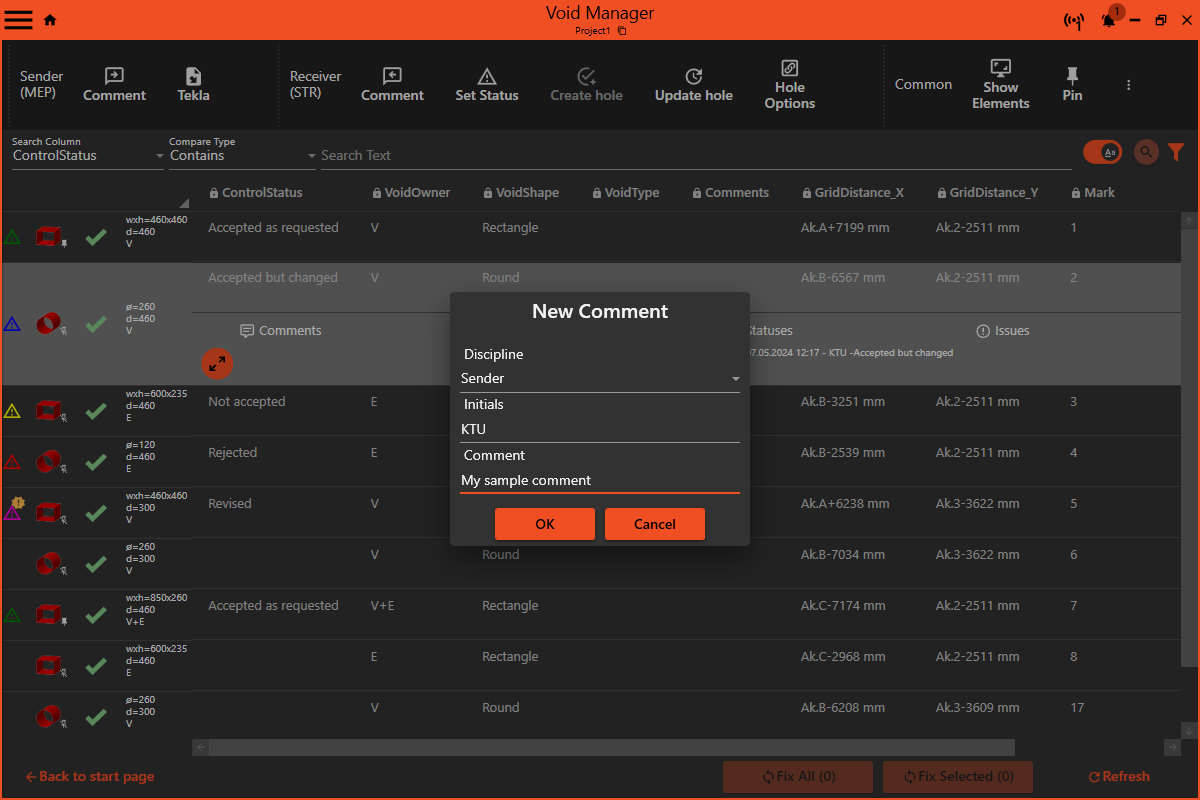
¶ Adding comments
- To add a new comment, select voids and click on the 'Comment' button in the toolbar (Either in MEP or STR toolbar).
- Enter your comment in the dialog box that appears.
A chat history is shown when you select void items in the list
Read about configureing comments
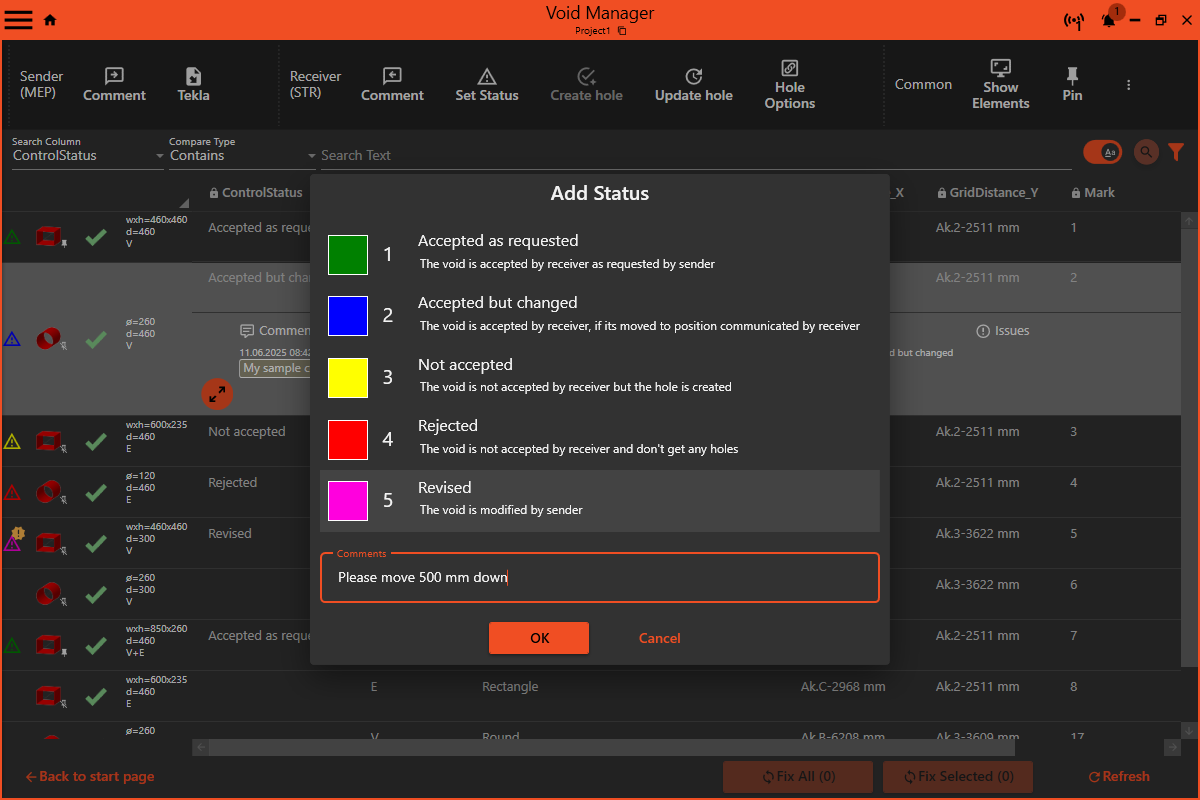
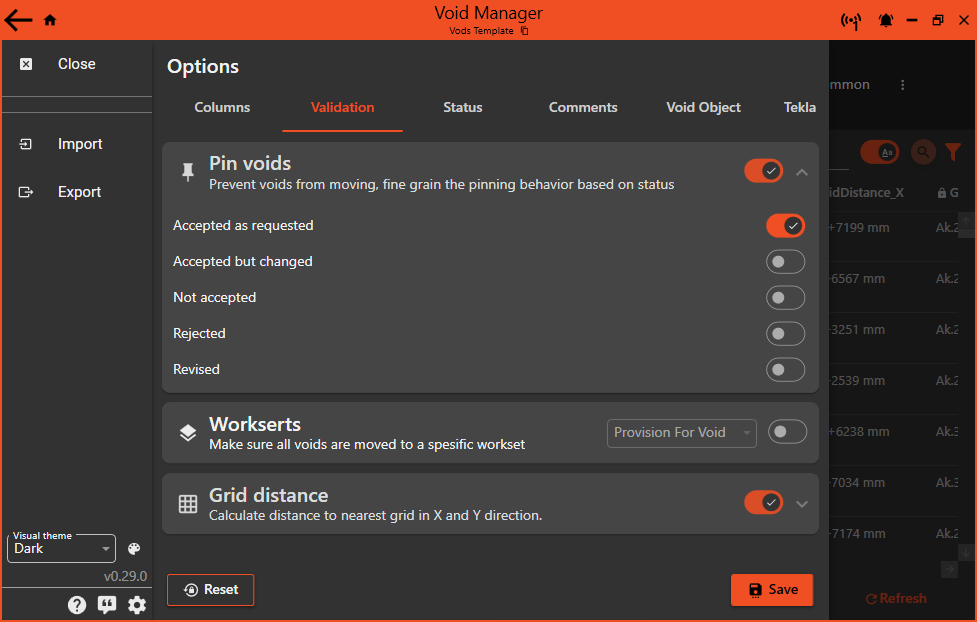
¶ Adding Statuses
- To set a status, select the void and choose ‘Set Status’. You will be presented with a dialog to pick from various statuses:
- Accepted as requested
- Accepted but changed
- Not accepted
- Rejected
- Revised
- Optionally you can give it a comment in the same dialog
A status history is shown when you select void items in the list
Read about configureing status
¶ Issues on voids
Issues on voids is maked by a notification circle by the void's shape image, showing the total count of identified issues, offering a quick overview.
Upon selecting a void item in the Void Manager, an issues list appear, succinctly highlighting potential concerns.
Moreover, the types of issues tracked and displayed can be customized via the options menu, allowing users to adjust the settings to better fit their project's specific requirements.
Read about configureing validation
¶ Creating Holes
¶ Creating and Updating Holes
- Once a void is accepted as requested, the STR modeler can proceed to create an actual hole by linking in the Void model and selecting the desired voids.
- Use the 'Create hole' or 'Update hole' buttons to manage the hole creation process.
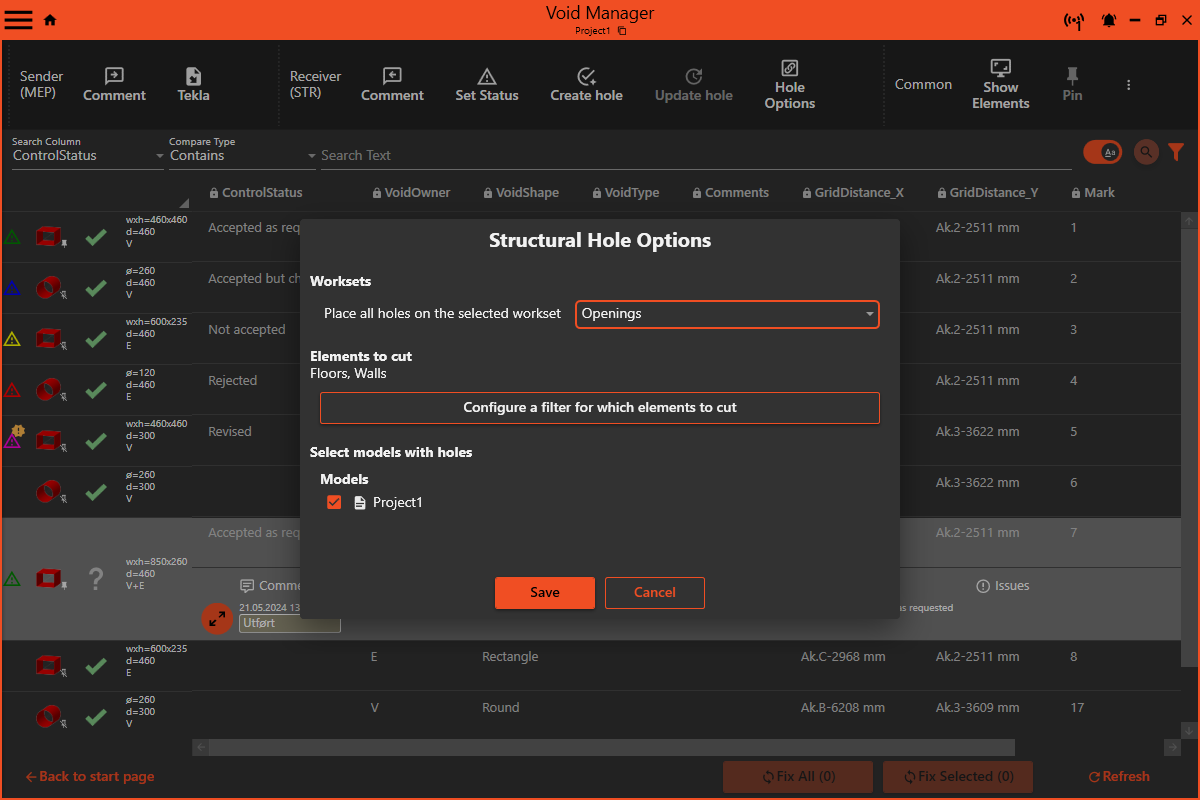
¶ Configuring Hole Options
- To specify options for hole creation, click on 'Hole Options'.
- Here, you can manage which elements to cut and which model holds the holes.
- Select the appropriate worksets and categories you wish to apply the holes to.
- Save the settings to apply the hole options.
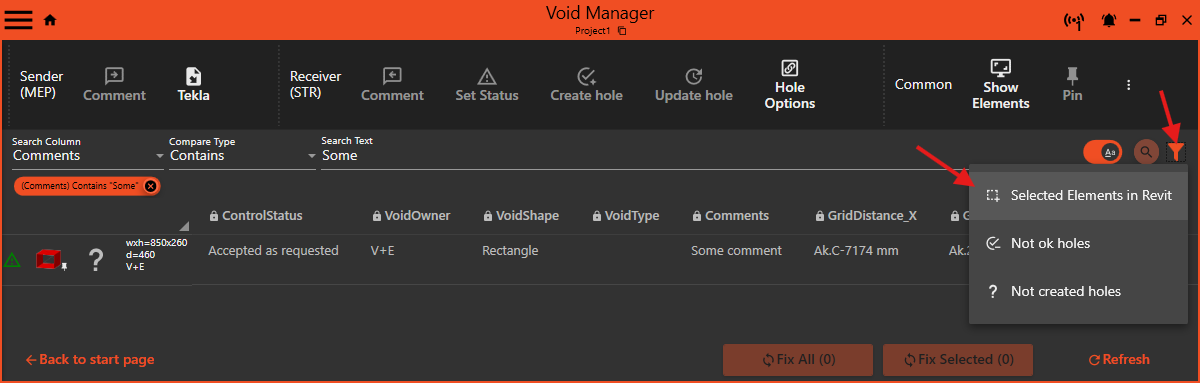
¶ Filtering and Selection
Use the search functionality to filter the list by specifying a column and a compare type.
Add multiple search filters or remove them as needed.
3. Use 'Select elements in Revit' under the filter button to pick elements directly from the Revit model.
¶ Filter by column value
¶ Filter by Selecting Elements in Revit
Enhance your workflow by utilizing the dynamic filtering feature to interact with elements directly within Revit. Follow these steps to refine your selection:
-
Initiate Element Selection:
- Click the filter icon and choose
Select Elements in Revitfrom the dropdown menu.
- Click the filter icon and choose
-
Choose Your Selection Source:
- Select Elements in Main Model: Choose this option to pick elements from the model you are currently working on.
- Select Elements in Linked Model: Opt for this if you wish to select elements from models linked to your current project.
- Use Current Selection: This allows you to use elements already selected in the main model.
- Add to Existing Selection: Select this to augment your current filter with additional elements you select.
By following these steps, you can efficiently narrow down your view to the elements that are most pertinent to the task at hand.

¶ Managing Filter Chips
Once you have applied your selection using any of the filtering methods, a filter chip labeled with your chosen filter's name will appear in the interface:
- Filter Chip: This is a small, interactive element that represents your active filter. It provides a visual and manageable way to keep track of applied filters.
¶ Clearing Filters
- To remove an applied filter, simply press the
clearbutton on the filter chip. This will immediately remove the filter and update the list to show all elements again.
¶ Understanding the UI
¶ Understanding Void Icons and Status Indicators
![]()
- Status Triangle: Displays a triangle with a color that indicates the latest status from the STR on the void, with each color corresponding to a specific status.
- Void Shape Image: A visual representation of the void's geometric shape, providing a quick reference to its form.
- Hole State Icon: See Understanding Hole Icons and Status Indicators.
- Linked Model Icon: A link symbol that indicates whether the void is part of a linked model.
- Issue Notification Badge: Shows a numerical count of issues flagged on the void, which are based on the validation settings.
- Dimensions:
- Circualar: Ø=600 means Diameter 600 mm.
- Rectangular: wxh=2020x620 d=300 means 2020 mm wide, 620 mm high and 300 mm deep (normally wall thickness).
- Owner: Who wants this hole can be multiple E+P+S
- E = Electical
- P = Piping
- V = Ventilation
- S = Sprinkler
¶ Understanding Hole Icons and Status Indicators
Efficiently monitor the status of holes within your Revit model using intuitive icons:
![]()
- Check Icon: A green checkmark signifies that the hole has been successfully created and is issue-free.
- Question Mark Icon: This icon alerts you that a hole is either not created or missing, prompting further investigation.
- Change Icon: A circle with an exclamation mark indicates that the hole has undergone changes since its last state, alerting you to modifications in size or position.
- Linked Model Icon: A link symbol highlights if the hole exists within a linked model, emphasizing connections between different models.
- Star Icon: Marks a hole that has been recently created.
- Time Icon: Denotes a hole that has been recently updated.
¶ Detailed Hole Insights with Tooltips
Gain a deeper understanding of hole specifics with detailed tooltips:
![]()
- Element ID: Shows the Revit element ID, allowing for precise referencing or selection within Revit.
- Unique ID: Provides a stable identifier for the element that persists over time.
- Document: Indicates the model name where the element resides.
- History: Details the user, date, and action reason such as Created/Updated.
¶ Status Breakdown:
-
Hole Statuses:
- Created
- Deleted
- Updated
- Failed to create/delete/update
- Changed
- Missing
- Wrong workset
-
Void Statuses:
- Changed
- Unloaded
- Missing
- No host elements found
- No shape defined
- Removed
- Host objects changed
¶ Common tools
¶ Show Elements
This command zoom to the selected elements in your 3d view.
¶ Pin, Un-pin
This command pins or un-pins the selected void and holes.
¶ Grid distance
Calculate the grid distance on selected voids.
¶ Configuring Void Manager
Read about configureing Void Manager
¶ Guides
Setting up Void Manager to Standard Workflow
¶ Features
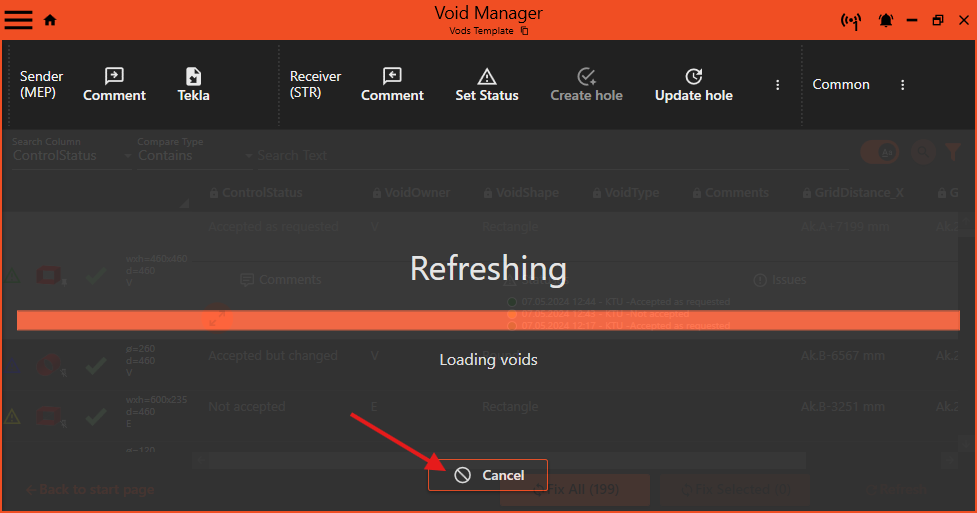
¶ Cancelable Loading
Loading voids can sometimes take a while. You can now cancel the process if needed—perfect if you change your mind or want to load voids from a specific view instead.
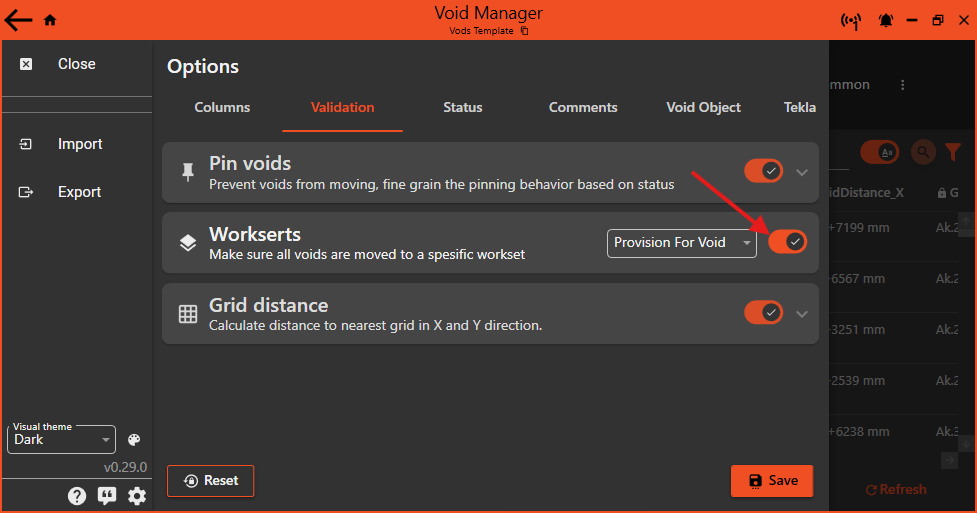
¶ Workset Validation
Void Manager can now check whether voids are placed on the correct workset, and automatically fix them if not. To enable this, open the options from the hamburger menu and turn on Workset validation.
¶ Improvements
¶ Simplified Options View
The options view has been redesigned for clarity. Settings are now grouped into clean, expandable cards with clear headings—similar to the style used in Windows 11.
¶ Modernized UI
The interface has been updated to follow the Material Design 3 specification. Dark mode colors have been brightened to improve contrast and accessibility.